If you’re looking up what to expect during a commercial painting project, you’re probably trying to plan ahead without disrupting your business. Maybe the project is already approved, or you’re close to pulling the trigger, and you want to know how the process actually works once a crew shows up on-site.
Most business owners aren’t worried about the paint itself. They’re trying to figure out what the job will feel like day to day. How long will it take? How much will it affect customers or employees? What needs to be moved or cleared? And what does a professional painting company handle without you having to babysit it?
Commercial painting tends to run much smoother when everyone understands the sequence upfront. When the plan is clear, there are fewer surprises, fewer last-minute decisions, and less downtime.
This article breaks the process down in practical terms, including what affects timeline and disruption, what happens during the walkthrough, how prep and repairs work, how painting moves through the building, and what the closeout process should look like when everything is finished.
What Affects Timeline and Disruption (So You Can Plan Around It)
When people ask what to expect during a commercial painting project, they’re usually asking one thing: how much is this going to interrupt normal business?
The timeline depends on a few practical variables, and once you understand how professional commercial painting services are structured, the schedule starts to feel far more predictable and easier to plan around.
Here are the biggest things that influence how long the job takes:
- Size and layout of the building: Bigger spaces take longer, but layout matters just as much. Open areas are faster to move through than buildings with lots of offices, hallways, and separate zones.
- Surface condition and repair needs: If walls are clean and in good shape, the crew can move quickly. If there are dents, peeling areas, stains, or rough transitions, prep work takes longer (and it’s what helps the finish look right).
- Dry time between coats: Some products dry quickly, but “dry” isn’t always the same as “ready for the next coat.” Dry time can shift based on the paint system and the environment inside the building.
- Occupancy restrictions and working hours: If work needs to happen after hours, around customers, or in specific time windows, the project may be phased over more days to keep operations running.
What helps the process feel smoother on your side is coordination.
Having a single point of contact makes a noticeable difference. When one person can approve access, answer questions, and coordinate internally, delays are minimized.
Locking in decisions early also matters. Final colors, sheen levels, and work hours may seem minor, but unresolved details can stall progress once work begins.
Finally, proper phasing keeps disruption low. Experienced crews work by zone in a sequence that aligns with how the building functions, rather than tackling everything at once.
The First Walkthrough and What Gets Confirmed On-Site
Most commercial painting projects follow a clear sequence, and the walkthrough is the first real step. It’s where everything moves from “we want these areas painted” to “here’s exactly how the job will run.”
This is also the point where a professional crew spots anything that could affect the schedule before work begins. Instead of guessing, they confirm what the building needs and how the space can stay functional during the project.
During the walkthrough, the crew will look closely at surface conditions. That includes dents, worn corners, patched areas, stained sections, and any spots where the existing coating is failing.
They’ll also check the layout and access points. Ceiling height, stairwells, tight hallways, and specialty areas all affect how the crew sets up and what kind of protection is needed.
Another big focus is how the building is used. The crew will ask about busy hours, quieter windows, tenant patterns, and any zones that need to stay open or can’t be touched until certain times.
Safety and building requirements are confirmed here too. Alarm systems, key access, elevator rules, signage, and any restrictions around odor, dust, or noise should be addressed early.
By the end of the walkthrough, a few things should be clear:
- What’s included in the scope (and what isn’t)
- Which paint system fits the surfaces, not just the color
- How scheduling needs to work so operations can continue
Once this step is done, the project can move forward with fewer surprises. The schedule becomes easier to map out, and the rest of the work flows in a more predictable way.
The Project Plan You’ll Get Before Work Starts
After the walkthrough, you should receive a real plan, not a vague “we’ll start Monday and see how it goes.” This is what keeps the process organized and prevents the job from turning into a daily disruption. Understanding how commercial painting projects are scheduled makes it easier to see why experienced crews rely on sequencing and phasing instead of trying to do everything at once.
Most commercial painting plans include:
- The sequence of areas (what gets painted first and what comes next)
- What gets protected first (floors, fixtures, equipment, glass, signage)
- Estimated timeline and expected working hours
- How many painters will be on-site and how the job will be staffed
- Any constraints like after-hours work, restricted zones, or tenant schedules
This is also the stage where a few decisions need to be locked in early. If they aren’t confirmed upfront, they usually become delays later.
Common items that need final approval include:
- Final paint colors and sheen choices
- Access approvals like key cards, elevator use, and alarm instructions
- After-hours entry rules, if the building will be closed during painting
- The point of contact for daily questions and quick decisions
A professional plan should also show how disruption will be minimized. That usually means painting in phases instead of attacking the entire building at once.
Phasing can look like:
- One side of the building at a time
- One department or floor at a time
- Quiet-hour work in high-traffic areas
- Working around customer-facing zones so business can keep running
When the plan is clear, the project feels easier. You know what’s happening next, you know what areas will be impacted, and you’re not constantly reacting to surprises.
Getting the Space Ready Without Turning It Into a Construction Zone
Once the plan is set, the next phase is getting the space ready. This is where people start wondering, “Is my whole building going to feel like a job site?”
In a well-run commercial project, the answer is no. Prep is meant to protect the space and keep things clean, not create chaos.
Most of the setup work is handled by the crew. That typically includes covering and protecting anything that shouldn’t get paint dust, splatter, or overspray.
Common protection steps include:
- Covering floors, baseboards, and nearby surfaces
- Protecting fixtures, counters, and built-in furniture
- Masking glass, hardware, and edges for clean lines
- Setting up containment if dust control is needed
Depending on the building and the area being painted, you may have a few simple responsibilities ahead of time. These are usually small tasks, but they help the crew move efficiently once work begins.
You may be asked to:
- Clear personal items from desks, shelves, or breakroom counters
- Move sensitive equipment or electronics if needed
- Relocate lightweight furniture in certain zones (only if requested)
- Communicate access details to staff, tenants, or customers
It also helps to know what “prep” means in commercial painting, because homeowners and business owners often imagine it as just taping a few edges.
In reality, prep usually follows a sequence: Protect first, then repair, then clean, then prime.
When this stage is done properly, everything after it moves faster and looks better. It also keeps the job from spreading into areas it shouldn’t, which is a big part of managing commercial painting expectations.
Surface Prep and Repairs (The Part That Determines How Good It Looks Later)
This is the stage that makes or breaks the final result. You can use great paint and pick the perfect color, but if the prep work is rushed, it usually shows.
Surface prep is what helps the paint bond properly, lay flat, and hold up over time. It’s also what keeps the finished space from looking “freshly painted but still beat up.”
On most commercial sites, prep and repairs include a mix of small fixes and surface conditioning. It’s not about making the building brand new, but it is about creating a clean surface that paint can perform on.
Common prep work includes:
- Patching holes from wall anchors, signage, or previous fixtures
- Repairing dents, dings, and worn corners in high-traffic areas
- Sanding rough spots and smoothing uneven transitions
- Caulking gaps around trim, door frames, and edges for cleaner lines
- Cleaning and degreasing areas like hallways, breakrooms, and touchpoints
In commercial spaces, cleaning matters more than people expect. Dirt, oils from hands, and buildup from daily use can stop paint from sticking the way it should.
Priming is also a big part of this phase, and it’s not something that should be skipped just to “save time.”
Primer is usually needed when there are:
- Heavy repairs or patched drywall
- Stains that could bleed through
- Raw or porous surfaces
- Glossy surfaces that need better adhesion
- Major color changes that require extra coverage
When prep is done right, paint goes on smoother and the finish looks more professional. It also helps the work last longer, which is a key part of the commercial painting process.
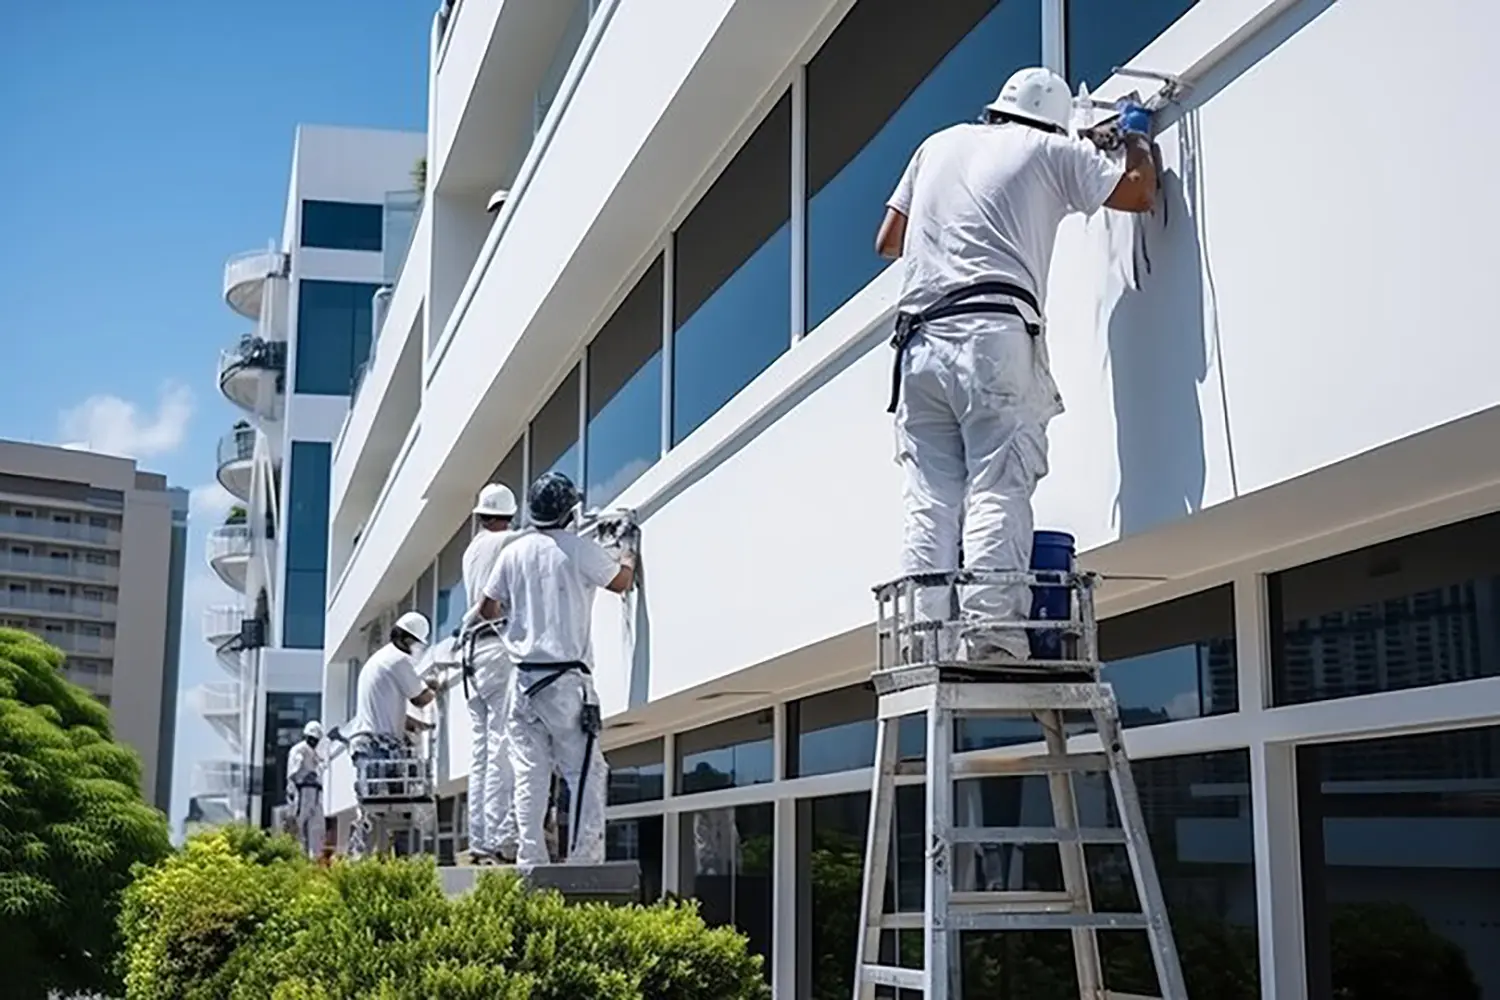
Paint Application (How the Work Moves Through the Building)
Once prep is done, the painting itself usually moves faster than people expect. But it still isn’t a “paint everywhere at once” situation.
A good crew works through the building by zone, in a planned order. That’s what keeps the job organized and helps prevent disruption from spreading into areas that don’t need to be touched yet.
How paint is applied depends on the space. Some areas need more control and detail, while others allow for faster coverage.
You’ll usually see a mix of methods, such as:
- Brush and roll in finished spaces where clean edges and control matter
- Spraying in open areas where speed and consistency are a priority (when appropriate)
As the crew moves through each zone, there’s usually a rhythm to the day. Areas get painted, allowed time to dry, and then reopened while the crew shifts to the next section.
This is also where drying and cure time starts to matter in a real way. Some areas can be used again quickly, while others may need a little more time before heavy traffic returns.
During this stage, the crew is constantly checking for finish quality as they go. That includes:
- Even coverage with no thin spots
- Consistent sheen from wall to wall
- Clean edges at corners, trim lines, and transitions
If odor control or disruption is a concern, professional crews often adjust their approach. That might mean painting during off-hours, using containment, or sequencing work so the most sensitive areas are handled at the right time.
When the commercial painting timeline is planned well, this part of the job feels steady and controlled. You can see progress day by day, without the building feeling like it’s been taken over.
Daily Check-Ins, Change Requests, and Staying Aligned Mid-Project
Even with a solid plan, commercial painting is still an active jobsite. The projects that feel easiest are the ones where communication stays simple and consistent from start to finish.
On a well-run job, you shouldn’t be chasing updates or wondering what’s happening next. You’ll usually get quick check-ins that keep everyone on the same page without taking up your whole day.
Most daily communication includes:
- What was completed since the last update
- What areas are next and when they’ll be worked on
- Any access needs or short-term disruptions to expect
This is also when change requests tend to come up. Sometimes it’s a small adjustment, like an extra touch-up in a high-visibility area. Other times it’s a true scope change, like adding a hallway or switching to a different paint system.
A good crew will clarify the difference right away:
- Touch-ups are minor corrections needed to complete the original scope
- Scope changes add work that wasn’t part of the original plan
If something changes midstream, the important thing is understanding what it affects. Changes can impact both timeline and cost, especially if they require extra prep, additional coats, or new working hours.
If you’re on the client side, the best thing you can do is flag issues early. Waiting until the end usually makes small problems harder to fix.
Common things to communicate immediately include:
- Access issues or changes to entry rules
- Schedule conflicts like events, inspections, or tenant requests
- Sensitive areas that need special handling
- New restrictions around noise, odor, or operating hours
When communication is handled well, the project stays predictable. That’s what keeps commercial painting expectations realistic, and helps everything finish on time without last-minute scrambling.
Final Walkthrough, Touch-Ups, and Closing Everything Out
As the project wraps up, the focus shifts from “getting paint on the walls” to making sure everything looks finished and the space is ready to run normally again.
This stage usually starts with cleanup. The crew removes floor coverings, masking materials, and protection from fixtures and surfaces. Equipment is cleared out, and the area is reset so it doesn’t feel like a jobsite anymore.
After cleanup, the crew typically does a final detailing pass. This is where small misses get corrected, edges get sharpened, and any spots that need one more touch-up are handled before you walk the space together.
During the walkthrough, you’ll review the work with the crew or project lead. This isn’t meant to be complicated, but it should be thorough enough that you feel confident signing off.
Most walkthrough reviews focus on:
- Consistency of finish across walls and visible areas
- Clean edges, corners, and transitions around trim and door frames
- Areas that needed repairs or patching, to confirm they blend well
- Any specialty spaces that had extra protection or requirements
If you see something, this is the time to point it out. A professional crew expects a final punch list, and the goal is to take care of those details while the job is still active.
“Complete” should mean more than the painting is done. It should mean the space looks clean, finished, and ready to operate without lingering mess, leftover materials, or unfinished touch-up areas.
When closeout is handled properly, the project ends cleanly. That’s what makes the experience feel smooth from start to finish.
Commercial Painting Timeline and Expectations: The Simple Version
A commercial painting project feels a lot less disruptive when you know the sequence ahead of time. It usually follows a predictable flow: walkthrough, plan, protection, prep, painting, final walkthrough, and closeout.
The best results come from three things that stay consistent throughout the job: solid prep work, clear communication, and a schedule that matches how your building actually operates. When those pieces are in place, progress stays steady and the work doesn’t spill into areas it shouldn’t.
Most of the stress people feel around commercial projects comes from uncertainty. Once you understand the commercial painting timeline and what happens at each stage, it’s easier to plan around the job and keep your business running without constant interruptions.
If you’re planning a commercial repaint and want clarity before anything starts, you can request a free painting estimate to schedule a walkthrough, confirm the scope, and map out a timeline that works around your operating hours.